Frequently Asked Questions & Best Practices On wedi Building Panels, Fundo Shower Pan Systems & Accessory Products

WEDI BUILDING PANEL
What is the wedi building panel? wedi building panel is a waterproof tile underlayment for walls and floors, manufactured by wedi GmbH in Emsdetten, Germany. It consists of an extruded, polystyrene core and is covered in a fiberglass mesh and cement resin coating. The blue foam core is closed cell which does not allow the transfer of 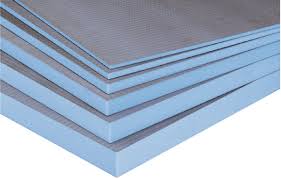 water and retards water vapor transmission. The alkali resistant glass mesh adds strength and rigidity to the wedi building panel. The cement coating allows for adhesion as a bonding surface to any polymer modified or epoxy based tile setting mortar. wedi building panel is engineered to be used in interior applications for the installation of ceramic tile and stone on walls, floors, countertops and many more applications where traditional backer boards are used. wedi building panel is available in 2′ x 4′, 3′ x 5′, 2′ x 8′, and 3’ x 8’ and 4’ x 8’ sheets in various thicknesses from 1/8″, 1/4″, 1/2″, 5/8″, 3/4”, 1″, 1 1/2″ and 2″.
What is the wedi building panel made of? wedi building panel is made up of three components: foam, mesh, and mortar. The blue foam is extruded polystyrene (XPS). It is inherently waterproof as it provides a closed cell matrix. This is due to the process under which the foam is created. The foam is extruded under enormous pressure, creating a dense mass of tiny, closed cells so tightly packed together that water cannot penetrate the foam, nor can the insulating air escape from the cells. The single foam cells share the surrounding cell foam walls with neighboring cells so that no room is left open in between the single cells in the matrix. The foam is then covered with a glass mesh to add strength and rigidity and a cement resin coating.
Who produces it? wedi building panel is manufactured in Emsdetten, Germany by wedi GmbH, which has been producing the product since 1982.
Why is the wedi building panel waterproof as opposed to “water resistant” backer boards? wedi building panel is 100% waterproof because of the material it is manufactured from. For example, the foam used to make a standard white coffee cup is highly compressed expanded Styrofoam. However, compressed foam will allow for liquid to move around the units of which it is made. wedi building panels consist of extruded foam, meaning that the foam is created through a process of infusing a styrene resin with a blowing agent. It is a single piece of foam containing air pockets within. The extruded polystyrene core is different than more common compressed expanded Styrofoam. With EPS foam, little balls of foam are tightly compressed together to hinder the passage of liquid through the independent pieces of foam.
This is why a liquid stain can often be found beneath a Styrofoam cup sitting on a cold granite countertop after it has allowed vapor transfer created by hot coffee or tea. This results in a foam matrix that is honeycomb in nature. The extrusion process creates foam that is closed cell. it lacks voids through which water can migrate. It also has zero capillarity and cannot wick water.
What sizes are available? wedi building panel is available in 2′ x 4 ‘, 3′ x 5′ , 2′ x 8’, 3’ x 8’, 4’ x 8’ sheets in various thicknesses 1/8″, 1/4″, 1/2″, 5/8″, 3/4”, 1″, 1 1/2″ and 2″.
How much do the wedi building panels weigh? wedi building panels vary in weight depending upon the thickness of the board. The 3 x 5 ft. x 1/2″ size is 8.67 lb.
Does the wedi building panel have an R-Value?
Yes, the R-value varies depending upon wedi building panel thickness at a rate of 4.3 per 1 inch.
Does the wedi building panel have a fire rating? wedi building panel will not provide a thermal or fire barrier. It will not add anything to a fire, as the cells of the foam will collapse due to extreme temperatures above 175°F. Where a one-hour firewall is required, wedi building panel should be applied over a surface that can provide such a rating such as certain drywall systems.
Does the wedi building panel have sound deadening qualities? wedi building panel is not engineered to be used as a sound deadening underlayment. It will lower airborne sound, but due to its firm and full surface contact bond to the substrate and tile, will not reduce impact sound.
Is wedi building panel or any of wedi’s foam-based products considered “green products”? Conventionally, “green products” are fully organic and sustainable. wedi foam-based products are therefore not “green”. However, the process of manufacturing is engineered to not harm our environment. Extrusion agents used are CFC free and the product obtained a Global Warming Potential rating per UN charts of 1. Global-warming potential (GWP) is a relative measure of how much heat a greenhouse gas traps in the atmosphere. It compares the amount of heat trapped by a certain mass of the gas in question to the amount of heat trapped by a similar mass of carbon dioxide. A GWP is calculated over a specific time interval, commonly 20, 100 or 500 years. GWP is expressed as a factor of carbon dioxide (whose GWP is standardized to 1). For example, the 20 year GWP of methane is 72, which means that if the same mass of methane and carbon dioxide were introduced into the atmosphere, methane will trap 72 times more heat than the carbon dioxide over the next 20 years. The substances subject to restrictions under the Kyoto protocol either are rapidly increasing their concentrations in the earth’s atmosphere or have a large GWP. wedi foam-based products also protect organic structural components of buildings such as wooden parts against rotting, replacement and mold, thereby actively prolonging the lifetime of an installation, resulting in a savings of resources and energy. In addition, wedi foam-based products add insulation and can eliminate heat leaks from building envelope insulation to help conserve energy.
Can wedi building panels be used on floors? Minimum 1/8” thick 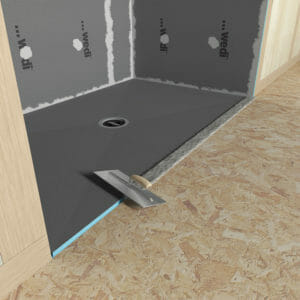 wedi building panel functions as an excellent substrate for most flooring applications. wedi building panel has been rated for heavy-duty commercial use by the Tile Council of North America (TCNA) using the industry standard known as the Robinson Floor Test. It can be applied over a wooden or concrete subfloor. When applied over plywood, the recommended joist spacing is 16″ on center, 5/8″ or greater plywood with no deflection in the subfloor greater than L/360 as outlined by the TCNA, following local building codes or the IRC. If applied over a concrete subfloor the slab should be fully cured and free of debris. wedi building panel will function as a crack bridging membrane because cracks in the cement will not transfer through the foam as easily as through other inelastic backer boards.
On the floor should I leave room for expansion joints between wedi building panels?
No, wedi building panel is inert and will not shrink or expand over time. All wedi building panels should be butted together. An expansion joint around the perimeter of the floor should be considered, leaving a gap of 1/8″ to the surrounding walls to better resist structural movement. Consider the use of expansion joints in the tile assembly over wedi building panels according to recommendations found in the Tile Council of North America’s (TCNA) Handbook for Ceramic Tile Installation.
Should I stagger the joints? Yes, wedi building panels should be staggered to minimize the length of breaks in the substrate.
Can the wedi building panel be installed on walls? wedi building panel can be applied directly to wood or metal studs, over gypsum board (green board or drywall), masonry walls and existing ceramic tile. The recommended thickness for a wall application is 1/2″, 5/8″, or 1″. The particular thickness is dependent solely upon the desired effect that the contractor wants to achieve. If a contractor is applying wedi building panels over gypsum board, the 1/2″ thick panel will most likely be used as this will allow for trim pieces of ceramic tile to cap where the wedi building panels end.
Can I install the wedi building panel directly to the studs? Yes, minimum ½” thick wedi building panels can be fastened directly to wood or metal studs with only a few fasteners per sheet (1 wedi fastener per 1 ft. of stud). When wedi building panel is applied directly to studs, the 5/8″ thickness can be used if the ceramic tile to be applied will have a flush or surface finish. The 1″ thickness can be applied directly to studs if a “floated” look is desired or over 19” on center framework. The framework itself must be designed as a loadbearing, suitable substrate.
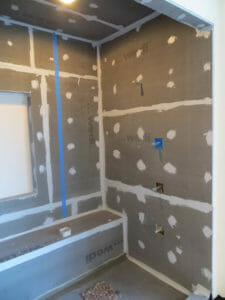
Can I install the wedi building panel over green board/drywall? Because wedi building panel is 100% waterproof, it is not necessary to use green board/drywall behind the installation. However, it is common for this material to be applied in wet areas and it has no detrimental effects on the installation if waterproofed with wedi building panel. Before installing wedi building panel over any gypsum-based product, a primer must be applied prior to application of polymer-modified thinset mortar which is used to attach the panel to such a drywall assembly.
Can I install the wedi building panel in a steam shower or steam room? Yes, wedi building panel is the preferred choice of backer board worldwide for several decades when it comes to steam rooms.
wedi building panels are not only 100% waterproof but also function as a vapor retarder. However, wedi does not support the current industry standards nor accepts the suitability of the test method applied. wedi does not determine any product with a positive permeability rating as a barrier but only as a retarder. wedi therefore recommends the application of wedi vapor barrier over wedi building panel to insure decades of safe functionality in a steam room application. This liquid applied barrier must not be confused with common waterproof membranes which will not act as a standalone protection in steam rooms. wedi diligently works on technical committees of NTCA and TCNA to change the industry standards to increase the required strength of a vapor retarder and/or barrier in steam room installations. wedi building panels also provide a thermal insulation value minimizing the water vapor pressure differential to the outside area behind the wall and ceiling substrate and add to energy efficiency through insulating the warmth in steam rooms. Please refer to wedi’s guidelines for steam rooms on our website or the wedi building panel technical data sheet.
Can I install the wedi building panel in a dry heat sauna? No, wedi building panels should not be installed in areas subject to temperatures above 175*F. The foam could deform in such installations and applied ceramic tile could heat up to a point, where users could get injured.
Can I install the wedi building panel in and around fireplace applications? This would depend on how close the wedi building panel will be located to the heat. wedi building panels should not be installed in areas subject to temperatures above 175*F.
Can I use the wedi building panel in an exterior application? wedi building panel is not recommended for use in exterior applications.
How is the wedi building panel cut? wedi building panel is cut with a utility knife. Scoring is unnecessary as the blade will be able to penetrate through the wedi building panel. Mechanical saws and handsaws can also be used.
The wedi building panel can be dented when pressure is applied. Will this cause a problem after the ceramic tile is adhered over these dents? No, once the cells in the foam are broken they will not re-inflate. When polymer-modified thinset mortar is spread over these indentations the voids are filled and will set as such. As long as the wedi building panel is not punctured all the way through the foam core, the waterproof qualities will remain. In situations where this is unavoidable (such as at the attachment points where nails or screws are used), wedi joint sealant must be applied.
Is the wedi building panel toxic? No, the foam is inert and inorganic. It will not produce carcinogens when handled or cut. It is produced utilizing a CFC-free blowing agent. All wedi foam-based products have a certified global warming rating of 1 (no negative impact).
How do I make tile repairs on wedi building panel installations? When removing ceramic tile from wedi building panel installations, cut grout and tile carefully before utilizing a strong putty knife to take off tile and mortar chips. Be careful when cutting, not to cut all the way through the panel as it will compromise the waterproofing. Refrain from using hammers or other tools that expose the wedi building panel assembly to vibration and impact pressure. This could cause seam sealing and reinforcement to open up and would put place the waterproof application at risk.
In the event that a full piece of wedi building panel is removed from the wall assembly, cut out the whole panel in the area and size of your ceramic tile. Use a utility knife with an extended blade so that this piece can be cut out with 45 degree mitered edges. Cut a replacement piece of wedi building panel with mirrored 45 degree mitered edges and insert the piece into the cutout in the wall after a bead of wedi joint sealant has been applied all around the contact seams for this replacement panel. Carefully seal the four seams with more wedi joint sealant and spread flat with a putty knife. Before applying wedi joint sealant, tape surrounding the ceramic tile so as not to get any wedi joint sealant on the new tile. Let the wedi joint sealant cure for 30 minutes. Now back butter a new tile and press it firmly on the repaired wedi building panel, keying the polymer-modified thinset in with a downward push first and move the tile up while pressing the tile firmly into position. Lastly, grout the area.
 Is the wedi building panel strong enough for a ceramic tile installation? wedi building panel has been rated for heavy-duty commercial use by the Tile Council of North America (TCNA). This means it can be used as an underlayment on floors in residential applications such as kitchens, living rooms, bathrooms or stairways.
In addition, spaces such as office buildings, breweries or anywhere that there is heavy duty use. When installed on walls, wedi building panels can support any standard ceramic tile or natural stone up to 23 pounds/sq. ft. On ceilings, it can bear up to 18 pounds/sq. ft. wedi building panel will not fail under normal conditions, including moderate impact.
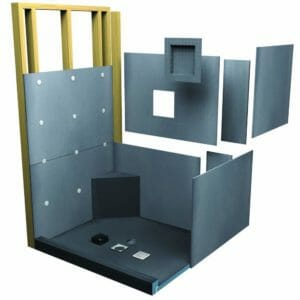
WEDI FUNDO PRIMO SHOWER PAN
What is a wedi Fundo Primo shower pan? wedi Fundo Primo shower pan is a prefabricated, tile ready pan that is installed on a wooden or concrete subfloor using polymer-modified thinset mortar (1/2″ thick). It does not require a shower pan liner underneath the system nor waterproofing on top. wedi Fundo Primo shower pan is already pre-sloped and includes a pressure fitting drain system with no weep holes necessary. It is made of extruded polystyrene foam and is 100% waterproof.
Which wedi Fundo Primo shower pan sizes are available? wedi Fundo Primo shower pans come in 3′ x 3′, 3′ x 4′, 3 ‘x 5′, 3’ x 6’ (center drain and offset drain), 4’x 4′, 4′ x 5′, 4′ x 6′, 4′ x 7′, 5′ x 5′, 5′ x 6′; 6’ x 6 ‘and 5′ x 7’ sizes. These are the standard sizes which are equipped with a 4” x 4” brushed stainless steel drain cover.
Can I cut a wedi Fundo Primo shower pan to size? Yes, using a circular or table saw, the wedi Fundo Primo shower pan can be cut to size. The drain is centered so in order to maintain a proper slope layout, the shower pan should be cut equally on at least two sides. The 1/2″ x 1/2″ channel along the wedi Fundo Primo shower pan perimeter always needs to be remade so that the 1/2″ wedi building panels will fit properly.
Can I extend a wedi Fundo Primo shower pan? Yes, using wedi Fundo Primo Shower pan pre-sloped extension panels. These panels always need to be connected to the shower pan using a shiplap notch which is prefabricated into the extension panels. When extension panels are cut, the shiplap connection has to be remade into the panel.
wedi joint sealant must be applied inside the shiplap joint and an additional bead is applied on top of the shiplap joints (use a putty knife to smooth the wedi joint sealant over the shiplap joints).
Do local building codes allow a wedi Fundo Primo shower pan system to be used instead of a conventional shower pan liner and mortar bed construction? Yes, local plumbing inspection departments recognize wedi Fundo Primo shower pan is rated as waterproof as per ANSI 118.10 (tested using ASTM D4068; 48 hrs. standing water exposure) and is certified with ICC-ES Report #PMG-1189 and therefore meets all UPC and IPC requirements.
How much time does it take to install a wedi Fundo Primo shower pan? A standard size installation, for instance 3′ x 5′, takes approximately 30 minutes to install. A wedi Fundo Promo shower pan is tile ready after being installed on a wooden or concrete subfloor.
wedi Fundo Primo shower pans are installed in polymer-modified thinset mortar suitable for a substrate. Can I use wedi joint sealant instead? No, please use a full surface setting bed of polymer-modified thinset mortar when installing the wedi Fundo Primo shower pan. This will insure that no floor imperfections or voids under the pan could possibly produce vibrations (transferring into tile and leading to cracks) or hollow space sounds.
Why is a wedi Fundo Primo shower pan installation less expensive than traditional shower pan liner-mortar bed construction? If done properly, the traditional method includes a pre-slope, shower pan liner and mortar bed, which easily takes 6-8 hours to install, compared to approximately 30 minutes for the wedi Fundo Primo shower pan. Depending upon the mortar bed thickness, 1-2 days drying time is often required before installing ceramic tile. The wedi Fundo Primo shower pan is tile ready immediately after installation.
Which ceramic tile sizes can be used with a wedi Fundo Primo shower pan? 2″ x 2″ or larger sizes can be installed with polymer-modified thinset mortar and cementitious grout. All ceramic tiles less than 2″ should be grouted with an epoxy joint filler compound. For commercial applications or where wheelchair use is expected, contact wedi Technical Support for the appropriate tile formats and setting material recommendations.
Why is a wedi Fundo Primo shower pan so much safer than a conventional concrete shower pan? The only way to safely install a conventional concrete shower pan is to apply waterproofing on top of the pan (though liquid membranes on concrete pans often crack). However, a pre-slope is typically installed underneath the shower pan bed and pan liner, which allows water to run towards the weep hole drain. This process is unpredictable and water may simply remain sitting in the porous concrete bed due to clogged weep holes and cause mold growth. Mortar bed shower pans often fail since the pan liner is sandwiched between the layers of concrete which can result in tears that cannot be seen or easily repaired (tears often occur especially where the pan liner is tightly installed over the curb and applied in a multi-corner fashion).
Another concern is the watertight installation of the pan liner toward the drain flange. Since the pan liner is nailed directly to the studs, leaks can occur where the fasteners penetrate it. Larger pan liner assemblies have to be joined together, the same as for corner pieces. These seams are subject to constant water pressure and may tear apart during floor movement or simply when mortar beds initially dry out upon installation and therefore shrink. The wedi Fundo Primo shower pan does not absorb any water like concrete and completely protects the substrate from water exposure.
Can I use a wedi Fundo Primo shower pan with any other ceramic tile backer board other than the wedi building panel? It is not recommended since the wedi Fundo Primo shower pan is part of a complete system offering a single warranty. With traditional backer boards, building codes require a vapor retarder behind the boards to connect onto a pan liner to protect the shower floor/wall including the curb. Such a waterproofing method installed “behind” or “under” the tile substrate must be applied throughout the floor and wall because the waterproofing products/layer has to be connected to contain water. However, a pan liner under a wedi Fundo Primo shower pan is not necessary. Therefore, a vapor barrier behind another backer board cannot be connected to the floor waterproofing. Although a pan liner is not needed underneath the wedi Fundo Primo shower pan, waterproofing is necessary in order to meet the 4″- 6″ wall requirement for traditional shower floor liners. With the wedi shower system, this is accomplished by using the wedi building panel with all seams being sealed with wedi joint sealant in between the panel joints and the channel connection of the wedi Fundo Primo shower pan, building panels and curb. One option is to use cement board. However, this board would receive topical waterproofing (instead of a vapor barrier/poly sheet behind) such as a sheet or liquid membrane. Such a membrane would have to be sealed and overlap onto all wedi shower floor components enough to create a secure connection. The warranty would fall to the cement board manufacturer and installation contractor.
How do I instruct the plumber to setup the drain system before installing a wedi Fundo Primo shower pan and pressure fit drain assembly? A 2″ Schedule 40 ABS or PVC pipe (per ASTM standards) needs to be installed where the drain is located. The 2″ pipe is cut flush to the surface of the subfloor. The trap is securely mounted underneath the subfloor so that the pipe and trap can carry water without moving. A hole 5″ in diameter must then be cut around the 2″ pipe to allow for installation of the wedi Fundo Primo shower pan drain assembly. The plumber can also install a 2″ pipe after completing the shower pan installation if access is available from below. If a cast iron or copper drain pipe exists, wedi offers special sealing gaskets for these applications.
What is the height of a wedi Fundo Primo shower pan? The height at the exterior edge is between 1 1/2″ and 2”, depending upon the size of the wedi Fundo Primo shower pan.
Do I need to use the black plastic extension collar in the wedi Fundo Primo shower pan drain kit box? No, this piece is optional and only used if the tile is extremely thick (i.e. ¾” thick slab material). In such cases, cut the extension collar to the correct height and insert it under the drain cover frame.
Do I have to glue or screw the drain cover and its frame to the wedi Fundo Primo shower pan? No, just insert the square frame into the round drain opening and then insert the drain cover plate. The system will be grouted into place.
The grout joint between frame and first tile may be filled with a flexible caull. However, polymer modified thinset mortar must be present underneath such caulking. Otherwise, a dam against water flow could build up and the shower will take longer to dry out.
 What is the best way to determine the wedi Fundo Primo shower pan size I need?
The best way to determine the size is to measure from the drain to the wall. Since all wedi Fundo Primo shower pans are centered with the exception of the 36” x 72” offset tub replacement size, use the larger number as the measurement for both sides of the shower pan. Once this is done, simply add the two numbers together and purchase a wedi Fundo Primo shower pan that closely approximates the size needed. When using a wedi full foam curb, it is necessary to determine if the curb will be installed in the shower pan footprint. If so, the pan will need to be cut 4“ shorter on the curb side. When using the full foam “lean” curb, the Fundo Primo shower pan will have to be cut 1 ½“.
How do I set small tiles on a wedi Fundo Primo shower pan?
When installing tiles that are smaller than 2” square on a wedi Fundo Primo shower pan, an epoxy-based setting material should be used. Square mosaics 2“and smaller should be grouted with epoxy grout. When installing river rock simply skim coat the wedi Fundo Primo shower pan using polymer-modified thinset mortar, then begin setting the stone and use grout recommended for this application by the joint filler manufacturer.
How do I layout for large format tile use on a wedi Fundo Primo shower pan? The best way to install large format tiles on a wedi Fundo Primo shower pan is to mark lines from each corner to the center of the drain location. For all sizes except the 36” x 72” offset tub replacement size, simply create an X and dry fit the tile on the shower pan. Once the desired look is achieved, install the tile using polymer-modified thinset mortar. Be sure to follow Tile Council of North America (TCNA) guidelines for proper grout joint spacing based upon the tile size. Install an expansion joint between the wedi Fundo Primo shower pan and bathroom floor tiles as well as the shower pan to wall transition as there is a change of plane.
What is the best way to address a wedi Fundo Primo shower pan cut too short? When a wedi Fundo Primo shower pan is cut too short, the best way to remedy this is to install a wedi Fundo Primo shower pan extension panel. Determine if the 2‘x 4‘or the 1’ x 6’ size is suitable. Utilizing an extension panel will guarantee a consistent slope into the shower pan area as well as a uniform, strong coating with limited water absorption.
What is the best method for applying polymer-modified thinset mortar to a wedi Fundo Primo shower pan? When installing the wedi Fundo Primo shower pan on either a wooden or concrete substrate, treat the shower pan like a large format tile. wedi requires a minimum 3/8“ setting bed for this application. When using a ½“ x ½“ notch trowel, simply flat trowel the back of the wedi shower pan and use the trowel to apply polymer-modified thinset mortar on the wooden or concrete substrate. When using a ¼“ x ¼“ notch trowel, apply polymer-modified thinset mortar on both the Fundo Primo shower pan and the floor with the trowel lines going in the same direction to insure that any air trapped will be able to escape.
How do I install the wedi Fundo Primo shower pan drain cover? Begin by removing the grid from the center of the drain cover frame and then install tile to the frame to insure a tight installation. Next, remove the frame to determine the height adjustment needed. Spacers or stainless steel washers are recommended to build up the corners to the desired height. For thicker tile installations, always use the black extension collar piece provided. Cut the extension collar using a wet saw and install it below the drain cover frame using wedi joint sealant on the corners.
When working with tiles that are thinner than the drain cover frame, it is best to determine the height adjustment needed. For example, if an additional 1/4“ of height is needed, a ½” x ½” notch trowel should be used. When the polymer-modified thinset mortar is compressed, half of the thickness of the original sized trowel should occur. Once the mortar has been applied, use the flat side of the trowel and knock down the trowel lines on a 90 degree angle. This will insure the proper height and also provide give better coverage when setting these types of tiles.
WEDI FUNDO LIGNO SHOWER PAN
Installing a wedi Fundo Ligno shower pan over concrete, or not recessing plywood ¾“, what is the best thickness of wedi building panel to use?
A ¾“ wedi building panel is the best thickness to utilize in this application. The wedi Fundo Ligno shower pan and building panel will create an even plane from the outside of the shower to the beginning of the shower pan. Be sure to notch the ¾“ wedi building panel to fit tightly against the existing notch in the wedi Fundo Ligno shower pan.
What thickness of wedi building panels can I use outside of the wedi Fundo Ligno shower pan to tie into the pan installation? Using ½“ wedi building panel is always the best and easiest practice. ¼“ wedi building panels can also be utilized, but a ½“ wide piece must be cut to fill in the ¼“ below the panel tying into the side of the wedi Fundo Ligno shower pan. Use wedi joint sealant to bond the strips in the notched channel to the wedi Fundo Ligno shower pan. Polymer-modified thinset mortar or wedi joint sealant is not recommended to fill in this notch.
How much can I cut off of a wedi Fundo Ligno shower pan?
wedi allows only 6“ to be cut off of any side of a wedi Fundo Ligno shower pan.
What is the best way to extend a wedi Fundo Ligno shower pan?
The best way to extend the wedi Fundo Ligno shower pan is to use a wedi Fundo Ligno shower pan extension panel. This will add ¼“ to the height of the perimeter which must be addressed by using additional polymer-modified thinset during the tile installation.
 Do I really have to waterproof outside of a curbless wedi Fundo Ligno shower? Yes, the reason for this is because of water splashing outside of the shower on top of the tile and because water will also easily wick through the polymer-modified thinset mortar that was installed below the tile. wedi recommends waterproofing the entire bathroom floor outside of all curbless showers. Additionally, waterproofing up the wall is just as important outside of the shower. A minimum 2“ high wedi waterproof sealing tape or building panel should be used to waterproof this connection since green board and cement backer boards will absorb water causing failures. Liquid-applied waterproofing is not recommended for this application.
WEDI FUNDO RIOLITO SHOWER PAN
How do I know what size wedi Fundo Riolito Neo shower pan to use?
Four versions of the wedi Fundo Riolito Neo shower pan are available that can be used in 12 different shower pan configurations without adding an extension panel. Simply cut the pan to fit the specific shower size needed taking into consideration that the center of the wedi drain unit must fit into the overall measurements of the shower floor area.
A wedi Fundo Riolito Neo shower pan can be modified if the cutting line is at minimum one inch away from the drain towards the main shower pan area. Once cut to size, the wedi Fundo Riolito Neo shower pan’s perimeter channel (Z notch) must be recreated and be at ½” wide by at least ½” deep (depends upon depth of adjacent channels on shower pan version used).
What is the best way to connect the wedi Fundo Riolito Neo shower pan drain? When installing the wedi Fundo Riolito Neo shower pan drain trap below the pan, the drain pipe must first be located. If installing on concrete, trace the area of the drain trap and begin chiseling away the concrete approximately 1“ below the surface. If installing on plywood, simply trace the trap with the template provided and cut the plywood to allow the trap to slide into the wooden substrate. The plumbing pipe should be cut 1¼“ below the top of the subfloor. Once the plumbing has been dry fit, the drain pipe is ready to be solvent cement glued to the trap. Finish installing the trap but do not use wedi joint sealant around the perimeter nor any screws to fix the trap. Support the trap unit securely so it cannot move under water load or otherwise. Fill the drain and trough with water to insure a proper connection immediately after setting the wedi Fundo Riolito Neo shower pan in polymer-modified thinset mortar. This will allow for quick adjustments if needed. Never walk or stomp on the drain but rather gently push it in place.
How do I check to make sure the wedi Fundo Riolito Neo shower pan is lined up right with the trap? This can easily be checked by dry fitting the wedi Fundo Riolito Neo shower pan prior to installation. Lay the shower pan in the desired location, then gently push and tap on it. Once the wedi Fundo Riolito Neo shower pan appears to lock into the trap, stop and pull it out. DO NOT STEP ON THE FUNDO RIOLITO NEO SHOWER PAN TO DRY FIT (it will be very difficult to remove and likely end up broken)! Fully inspect the wedi Fundo Riolito Neo shower pan for a snug fit all around and only use the special wedi screws provided.
What is the best way to install the wedi Fundo Riolito Neo shower pan drain cover plate? After using the spacers that are provided with the wedi Fundo Riolito Neo shower pan as a template to complete the tile installation, simply dry fit the drain cover with the height adjustment spacers. Measure from the top of the drain to the top of the tile plus compressed polymer modified thinset layer and add 1 mm. Remove the height adjustment spacers from the drain cover plate and screw them onto the spacers provided in the drain trough. Mark the height adjustment spacers to the measurement taken and cut off the top side of the spacer once the brass collar has been removed. Once cut, simply reinstall the brass collar and slide the adjustment spacers back into place.
WEDI CURBS
How much can I cut a full foam curb? A full foam curb should not be cut less than 2“ wide and 3 ½“ tall and cut from the bottom as the top of the curb is sloped.
Can I use screws in the top of curbs, seats and knee walls? No, best practice is to use polymer-modified thinset mortar to adhere the wedi building panel to a wood framed curb, seat or knee wall cap. On smaller areas (and very flat areas such as the top of a curb or knee wall), wedi joint sealant can be used to bond the wedi building panel to the wood framing.
WEDI RECESSED NICHES
A wedi niche is not the right size, width or height, can I modify this?
Yes, any wedi niche can be cut and re-sized to fit specific tile installation needs. The niche can be cut in half vertically or horizontally. Cuts must be made using an appropriate saw allowing for safe and exact cutting of the sealed niche. After cutting the niche and installing the top and bottom sections, a piece of wedi building panel will need to be installed in the center section to complete the niche construction. Cut ½“ wedi building panel to fit tightly and use wedi joint sealant to bond the wedi building panel to the adjacent wall. Add ½“ wedi building panel to the sides of the 2’x4’ to build it out enough for the wedi building panel to create the internal sides. Add wedi board along the face of the studs, use wedi joint sealant in between all seams and wedi screws and washers every 12“ per wedi installation instructions. Cutting two wedi niches and combining them to create a larger niche is an easy and reliable option. Reducing niche openings can also be done by inserting/gluing a bottom and top strip of two ½” wedi building panel pieces laminated to a 1” piece. Spacers are set back ½“ from the front face of the niche. Another piece of ½“ wedi building panel needs to be attached as a front cover over the spacers.
Can the 2“ shelf in the niches be modified?
Yes, this can easily be modified and reduced to 1“ minimum thickness. The shelf can also be cut in half to create a more modern niche where two smaller shelves are offset by installing half of the shelf lower on one side and higher on the other side.
Can I combine niches to create one large niche?
Yes, if a larger niche is needed, simply cut the 2“ flange from the top of one niche and the bottom of the second niche to be used. Seal them together using wedi joint sealant and install using wedi screws and washers. If there is a stud in the wall where the niche is being installed, two niches can be combined where the flange goes over the stud creating a vertical separation.
WEDI SEATS & BENCHES
Can I install a wedi suspended corner seat after the tile has been installed?
Yes, simply mark where the seat will be installed and cut out the tile and wedi building panel (must hit two studs). Reinstall wedi building panel using wedi joint sealant around the perimeter of the area removed to insure that the new panel is cut tight and cleanly. More wedi joint sealant needs to be added around the inside perimeter to insure a proper seal. After 30-45 minutes, install the cleats provided followed by using wedi joint sealant to install the suspended corner seat. In this case the tile should be set with a pitch to offer water a slight runoff (or this is done with the seat when the tile is cut out).
Can I install benches or countertops made from 2” wedi building panel and do I have to treat the blue foam edges prior to tiling? Yes, benches and countertops can be installed without any wooden framework. wedi building panels should be cut and fit together using wedi joint sealant. When an exposed blue foam edge remains (such as at the front of 2” wedi building panel used as a countertop), a strip of 2” wedi building panel should be glued to this edge to restore a cement resin coated surface prior to setting tile.
Can I install a seat built from the floor up after the tile has been installed? Yes, use 2“ wedi building panel to install a seat after the installation of tile.
Simply dry cut wedi building panel to the desired height and width. Use wedi joint sealant to bond the wedi building panel to the tiled walls and floor. In addition, install wedi joint sealant around the perimeter using a standard caulk joint. This will keep the sealant off of the tile and provide the sealed joint size necessary around the perimeter as well.
Can I build a floating seat out of 2“ wedi building panel?
Yes, a floating seat up to 18“ in length can be built on the wall using a minimum 2“ thick wedi building panel (can be glued to 4“ or thicker if needed). Use wedi joint sealant to bond wedi building panel to the wall and alkali resistant fiberglass mesh tape around the perimeter of the seat prior to tiling.
How do I frame a seat using 2“ wedi building panel? When building a seat from the floor up, standard framing practices should be used. Install 2” wedi board every 18“ for support and include a sloped top. If additional blue foam is exposed after sealing the seams with wedi joint sealant, simply key in polymer-modified thinset mortar over these areas and then begin tiling.
WEDI SUBLINER DRY WATERPROOFING SHEET MEMBRANE
What is the best way to waterproof showers that already have drywall or cement backer board? wedi Subliner Dry waterproofing sheet membrane is recommended for this situation. Simply install the Subliner Dry over the drywall or cement board using polymer modified thinset mortar. When installing over CBU, prime the wall first using a wet sponge. This will insure that moisture from the mortar is not absorbed too quickly causing a bond failure. Drywall should also be primed with a latex admixture. wedi inside and outside corners as well as wedi waterproof sealing tape should be used in the corners from floor to ceiling and at the wall-shower pan connection.
What is the best way to seal off shower valves and plumbing fixtures? When sealing valves and plumbing fixtures, prefabricated wedi mixing valve flexi collars and flexi collars for sealing around ½” to ¾”pipe protrusions should be used prior to tiling. Custom valves and protrusions can be sealed using wedi Subliner Dry waterproof sheet membrane cut to fit tightly around protrusions or covering cut outs for valves.
WEDI VAPOR BARRIER
 How do I prepare wedi two component epoxy vapor barrier for installation? Begin by checking the wedi epoxy vapor barrier to insure that the use by date printed on the label has not expired. Unseal the unit and remove the black or red button on top of part A. Poke a hole in the seal and turn the container upside down. Allow the entire part A to thoroughly drain into part B. Once completed, use a metal polished stainless (PS) jiffy blade mixing paddle to mix the two part epoxy for five minutes on low speed. Immediately pour the contents into another container such as a metal paint tray and remix once again before installing. DO NOT USE MIXING PADDLES OR PAINT TRAYS MADE OF PLASTIC. Apply at least two coats of the vapor barrier to all interior wedi building panel surfaces. TILING MUST BE COMPLETED WITHIN FIVE DAYS OF INSTALLATION or additional epoxy has to be applied over the exposed area after scarifying the old surface.
SEAM TREATMENT
Do the seams in an installation have to be treated? Yes, all seams should be treated with wedi joint sealant. In cases where waterproofing is not needed such as on a floor outside of a wet area, alkali resistant fiberglass mesh tape can be installed using polymer modified thinset mortar to provide a continuous bonding surface. wedi joint sealant is recommended in wet areas. When installing wedi Subliner Dry waterproofing sheet membrane, use wedi waterproof sealing tape to waterproof the seams following wedi installation instructions accordingly. If wedi joint sealant is used, no sealing tape is needed since the sealant is highly flexible in one application. Do not use silicone caulk as polymer modified thinset mortar will not bond to silicone and it cannot withstand the expected long term performance requirements of a shower installation.
How are wedi joint tapes applied? All wedi joint tapes should be applied using polymer modified thinset mortar.
Does the additional installation of wedi sealing tape over seams treated with wedi joint sealant add any benefit? No, wedi sealing tapes are installed with polymer modified thinset mortar. Under water pressure, the mortar may allow water to migrate under the sealing tape. This will not happen when wedi joint sealant is used. In cases of extreme movement, sealing tape will not add any additional strength to a seam treated with wedi joint sealant. It is actually the weakest link in an assembly that will break first thus rendering the sealing tape useless. When properly applied, wedi joint sealant alone not only stops water migration but also is stronger and more flexible.
Can I substitute another product for wedi joint sealant? No, wedi joint sealant is a proprietary product engineered for durability and waterproofing while maintaining flexibility for the lifetime of the wedi installation.
SUBSTRATE PREPARATION
What do I do if the floor is uneven? When working with uneven floors, decide if using a self-leveling underlayment is the best option. Many self-levelers contain gypsum and should not be used in wet areas. In addition, these products have a maximum recommended thickness as well as specific installation instructions for bonding to wooden and concrete substrates. In many cases, medium bed mortars can be applied up to ¾“ thick when troweled, resulting in 3/8“ compressed setting bed.
How can I recess the required ¾“when the joists are TGI?
Inquire with a local building inspector about IRC code compliant ways to recess the plywood ¾“. Industry organizations such as TCNA and NTCA do not currently have a standard for this type of installation.
What is the best way to level out a leaning wall? The best way to level out a leaning wall is to install wood shims cut from dimensional lumber thus providing a perfectly flat surface to install your fasteners. Do not use polymer modified thinset mortar behind the wedi building panel to flatten out the wall